Wheel bearings play a vital role in keeping your vehicle running smoothly. In fact, if they don't work properly, you could be in for a very bumpy ride. While removing and replacing them can be tricky, with a little effort and know-how, you can repair worn wheel bearings.
NSAR oferece rolamentos de qualidade.
O que são rolamentos de cubo de roda
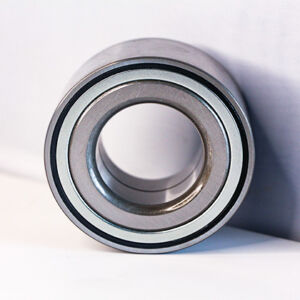
Wheel bearings are an important part of your vehicle's suspension. Usually located in the wheel hub, rotor, or brake drum, the bearings help the wheels rotate smoothly as the vehicle moves.
The two main functions of a wheel bearing are to ensure that the wheel rolls along the road and to support the weight of the vehicle.
How to Determine If It's a Wheel Bearing
To determine if it's a wheel bearing problem, try reaching under the fender and grabbing the top of the wheel. Shake it as hard as you can with all your weight.
If you feel any movement, you need a new wheel bearing. If you don't feel any movement, jack up one corner of the car and support it with a jack stand. Try the same thing. If the wheel wobbles, the bearing is probably at the end of its life.
The wheel hub assembly is the part that holds the tire and wheel to the car. Therefore, you need to be 100% sure that the replacement is done correctly. If you are not sure if you are up to the task, leave the job to the professionals.
But if you know how to turn a wrench - and know how to do it safely -
montagem do cubo da roda a substituição geralmente não é muito difícil.
Dicas de substituição
If you do need to replace the wheel hub assembly, here are some tips to make the job easier. First, spray the wheel hub bolts with penetrating oil the night before you begin the repair. The longer the penetrant soaks in, the better the effect.
In addition, an air compressor and a heavy-duty air wrench can also help with the job. An air hammer with a socket adapter can also be used to loosen hard-to-tighten wheel hub bolts.
But the best advice is to be prepared for a challenge - especially if you live in an area with high levels of road salt in the winter. While wheel hub assembly replacement is simple in theory, years of accumulated rust and corrosion can make the job very difficult.
Comece a substituir os rolamentos do cubo da roda
1. Estacione seu veículo em uma superfície plana
Tal como acontece com a maioria dos tipos de reparos automotivos, você precisa tomar todas as precauções necessárias para garantir sua segurança ao substituir os rolamentos das rodas. A pior coisa que pode acontecer ao substituir os rolamentos das rodas é o veículo se mover ou rolar repentinamente. Antes de começar, estacione seu veículo em uma superfície plana. Coloque seu veículo em posição de estacionamento (1ª, ré ou ponto morto para carros com transmissão manual) e certifique-se de que o freio de estacionamento esteja acionado.
2. Use calços para fixar a roda na qual você não está substituindo o rolamento
Para maior estabilidade, é aconselhável usar calços resistentes para fixar a roda no lugar. Obviamente, você precisará usar calços nas rodas que não irá modificar, pois a roda que você está modificando estará mais acima do solo. Por exemplo, se você estiver reparando o rolamento da roda dianteira, deverá colocar o calço atrás da roda traseira; se estiver consertando a roda traseira, você deve colocar o calço atrás da roda dianteira.
3. Solte as porcas e levante a roda com um macaco
Para acessar adequadamente os componentes internos da roda na qual você está substituindo o rolamento, será necessário levantar a roda. Felizmente, a maioria dos veículos vem com um macaco. Antes de levantar a roda, porém, pode ser necessário afrouxar ligeiramente as porcas com uma alavanca de pneu, pois será difícil quebrar a resistência inicial das porcas sem que o solo apoie firmemente a roda. Depois disso, levante cuidadosamente a roda. Se o seu carro não tiver um macaco, pode ser necessário comprar um macaco adequado em uma loja de artigos automotivos.
4.Desaparafuse as porcas e remova a roda
The nuts should have loosened and should be easy to remove. Remove the nuts and place them in a safe place where they will not be lost. Next, remove the wheel itself. It should come off freely. Some people like to keep track of the nut by taking off the hubcap, flipping it over and using it as a sort of "dish" to hold the nut.
5. Remova a pinça do freio
Use a socket and ratchet to remove the caliper bolts. Then use a screwdriver to remove the caliper itself.
When removing the caliper, be careful not to let it hang freely, as this could damage the brake hose. Instead, hook it to a fixed part of the chassis or use a short piece of rope to tie it in place. Bungee cord or bent wire hooks are two other ways to secure the caliper.
6. Remova a tampa contra poeira, contrapino e porca castelo
Deve haver uma pequena tampa de metal ou plástico no centro do rotor exposto do seu veículo, chamada tampa contra poeira, que protege as peças que mantêm o rotor no lugar. Como é necessário remover o rotor, é necessário remover a tampa e as peças que ela protege. Normalmente, a tampa contra poeira pode ser removida prendendo-a com a pinça e depois batendo na pinça com um martelo. Dentro, você encontrará a porca castelo, que geralmente é fixada com uma cupilha. Remova a cupilha com um alicate ou alicate, desparafuse a porca castelo e remova-a (e sua arruela).
7.Remova o rotor
Place your thumb firmly on the nail in the middle of the rotor assembly. Use the palm of your other hand to tap firmly (but gently) on the rotor itself. The outer bearing of the wheel should come loose or fall off. Remove the outer bearing. Finally, remove the rotor itself.
If the rotor is stuck, you can use a rubber mallet to knock it loose. But this may damage the rotor, so it's best to use a mallet only if you don't plan to reuse the same rotor.
8. Desparafuse os parafusos do cubo e remova o cubo antigo
Os rolamentos do cubo estão localizados dentro do cubo e geralmente são fixados com vários parafusos rosqueados na parte traseira. Esses parafusos podem ser difíceis de alcançar porque estão escondidos no chassi, portanto, pode ser necessário usar uma chave de caixa fina e/ou uma barra de disjuntor para soltá-los e removê-los. Depois que os parafusos forem removidos, remova o cubo do eixo.
9.Remova o conjunto do cubo
To access the bearings, you need to disassemble the hub. You may need to use a wrench (and/or hammer) to remove the end of the hub and any anti-lock brake wheels that may be on the hub. You may then need to use a specialized "puller" tool to remove the center bolt. The bearing assembly should come apart easily.
10.Remova a pista e limpe a junta
Removing the raceway of a bearing assembly usually means physically breaking it up with a grinder or hammer and chisel. So you need to have a replacement raceway ready. After removing the raceway, it's a good idea to clean the inside of the bearing assembly around the knuckle.
PONTAS: There's usually a lot of grease and dirt here, so have plenty of rags ready.
11.Instale a nova pista e o novo rolamento do cubo
Instale a nova pista no
conjunto de rolamento com algumas batidas de martelo. Por fim, lubrifique o novo rolamento interno e instale-o no conjunto. Certifique-se de que o rolamento esteja devidamente alinhado, empurrado ao máximo e que todas as vedações estejam niveladas com a parte externa do conjunto.
12.Substitua todas as peças na ordem inversa
After replacing the bearings, basically all that's left to do is reassemble the wheel. But don't forget that this means installing a new outer bearing once the rotor is in place. Reassemble the hub assembly and install it on the axle. Reinstall the rotor and bolt it in place. Install a new, well-greased outer bearing at this point. Gently tighten the castle nut and secure it in place with a new cotter pin. Replace the dust cap. Put the caliper and pads back in place and secure them with the appropriate bolts. Finally, put the tire back in place and secure it with the nut.


